The Arum Dress by Angela - Devon.threadtales

Hello, my name is Angela and I live in Plymouth where my most local haberdashery, and dress making shop is the beautiful Make at 140.
I was so delighted to make something for a blog for Lizzy, and choosing some of her delicious fabric. However this was actually quite difficult as she has so many goodies of all sorts, from cotton, to rayons, jersey, knit fabric etc etc.
The best idea, was to think of what pattern to make first. I chose the Deer and Doe Arum dress, as this is a simple and easy to wear garment, and will show off fabric beautifully. Lizzy stocks a huge range of patterns from a large variety of independent designers. This being one of the many. I had also made this dress before, so felt confident in making it again with the fabric.

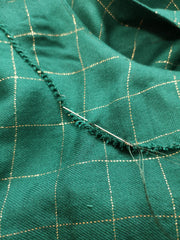
Lizzy has a huge choice of soft and floaty fabric. In the end there were a selection of fabrics that caught my eye in particular and they were the Eglantine and Zoe fabrics, a French designer. The fabrics are a viscose twill and come in a few different colour ways, a navy, black, claret red and a deep forest green, which is what I went for. Each of the colours have a fine gold thread running through them in grid like style.

Fabric chosen, I made sure I washed it. This is so important as fabric can and often shrinks once it has been washed. If you make a garment up with fabric before washing the it, it is likely to not fit you once it has - and that would be very disappointing. Once washed and dried, I ironed the fabric, which is at the point that I realised that the fabric has lots of movement, so I decided to lay my fabric out in a single layer and move the patterns pieces, as opposed to folding the fabric and placing the pattern pieces on the fold. This way I would have much more control over the pattern placement and ensuring that the grids / lines ran horizontally across the body, and wouldn’t end up wonky or running downhill 😂.

I decided that I was going to add the pocket. This isn’t something that I think I would ordinarily do, as it isn’t a useable pocket, more of a feature. However I thought it would be interesting to play with the direction of the grid pattern. So I marked out the pattern with a chalk roller so I could accurately sew this on later.

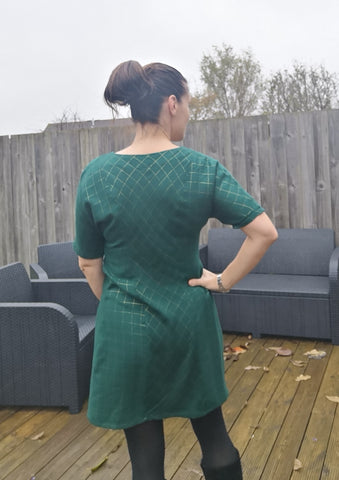
When laying out the side back pieces, there isn’t a straight side edge, so I extended the grain line on the pattern piece to easily lay this against one of the grid lines. Then as a bit of fun, I thought that I would lay the back centre panel diagonally across the fabric, so the back of the dress had a little interest to it too. Hopefully you can see from the picture how I have ensured that the centre runs across the diagonal of each grid.

For the most part this dress is incredibly easy to construct. You firstly attach the two back side pieces to the centre back. Join the front and back via the shoulders, and then the 2 side seams. It’s as simple as that. I used a size 60 needle on my sewing machine, and overlocked the seam allowances. Once you have done this, all that is left to do is attach the pocket (if you are opting for this) attach the neck facings and hem.
The neck facings are incredibly easy to attach, there is no easing in of fabric. Probably the trickiest part is under stitching the facing to the seam allowance. I always find it easier to sew this prior to ironing. You get a better finish by gently pulling apart the seams as you are stitching rather than ironing first. I also swap out my presser foot for an Edging Foot for this task, as it makes keeping close to the original stitch line really easy. (Mine came with my machine - as I think most machines do)


Once the facings are sewn in, to help keep them in place, the pattern tells you to “stitch in the ditch” which is sewing in the seam line of the shoulders, to hold the facing down each side. You do this with catching a few hand stitches on the front and back facings on the inside.

I decided to add a label from a pack of labels I previously bought from Make, from Kylie and the Machine. I love these labels, they just add that little something else!
Then finally, I’ve hemmed both the sleeve and the bottom hem. I have done this by simply pressing the hems over by 1cm and then a further 1cm. I increased my stitch length here, and used my trusty, smiley hem guide to ensure nice straight lines! Then a light press - and voila, my dress is complete!

I did at this stage decide that the pocket was not adding anything, actually I felt that it looked like it was pulling on the dress, so I removed it. Probably I won't even bother to add this another time.

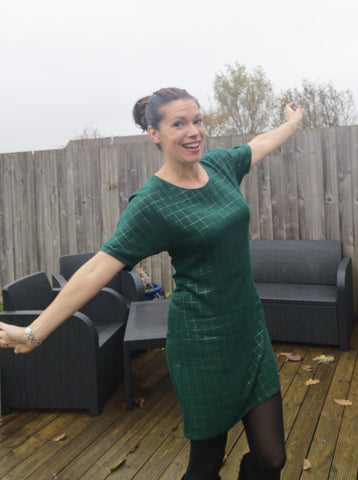
I really feel that this dress has a Christmas vibe to it, due to the colour and the fabulous gold thread. I’m pretty sure I will be wearing this over the festive period, as it feels really nice and dressy, but is totally comfortable. It isn’t tightly fitted either - so will possibly be a great option for Christmas Day - Christmas dinner, annndd pudding!!!


I quite like it with a soft thin scarf, and my denim jacket too, making it much more casual.

Thanks again to Lizzy for the beautiful fabric and to letting me blog for you.
Take care everyone, and happy sewing xx

A little note from Me Lizzy :)
I love Angela's Arum it has inspired me to use this pattern and sew my own, such a lovely shape and yes the fabric is stunning.
I really love how Angela added detail on the back with the different direction.
Thank you so much for blogging for me. You have done a fabulous job Angela. xx
If you are a keen sewist and would like to write a blog post for us please do get in touch
info@makeat140.co.uk


This dress looks lovely and your use of the geometric design adds a certain something. The blog post is very informative and I am particularly interested as I had the pattern for Christmas. I think that the fitting of these looser fit dresses is crucial and it fits you beautifully. It’s a pattern that will work well in the summer months too as will be so cool.
Lovely dress. Great blog.
Lovely blog x I’ve downloaded this pattern and really appreciate being able to see it made up. The fabric is perfect
Great blog post! I am going to stitch something soon with a geometric pattern and this has really helped with ideas for how to cut the fabric
This is a brilliant blog . It is really good to see the dress actually being made and then the finished pictures.
Leave a comment